Using Valence Between Two Salesforce Orgs (aka Salesforce to Salesforce)
You can use Valence to move data between two (or more) Salesforce orgs. You will only need to install Valence in one org to do this (in this guide we’ll call the org that has Valence installed the “controlling org”).
Tip
All configuration work for Valence will take place in the org where Valence is installed (the “controlling org”). Any Sync Event or Record Snapshot records for diagnostics will be saved in this org as well.
Setting up Links in Valence to move data is the easy part. The harder part is setting up your authentication between the Salesforce orgs. Let’s start there.
We will need to set up three things:
Connected App
Auth. Provider
Named Credential
A Connected App defines an entity that will be calling into a Salesforce org, and an Auth Provider defines how to call out from a Salesforce org. Since we are communicating between two Salesforce orgs, we need both—from the perspective of the remote org it’s inbound (Connected App), and from the perspective of the controlling org where Valence is installed it’s outbound (Auth Provider).
You’ll define both the Connected App and the Auth Provider in the controlling org. How is that possible, you say? Well, Salesforce is clever and propagates Connected App definitions to all orgs, so a Connected App defined in any org can be used in any other org.
If you really wanted to, you could create the Connected App inside the remote org instead. This would give you some additional configuration options, but those aren’t that useful for Valence so we recommend keeping it simple and defining everything in the org where Valence is installed.
Set Up The Connected App
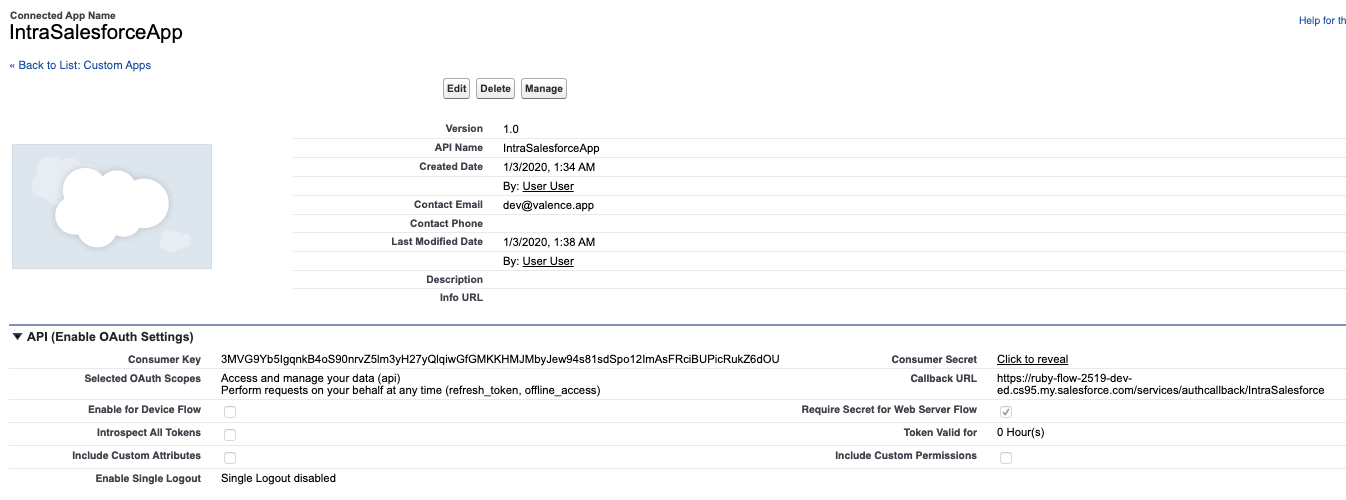
Create a new Connected App in the Setup menu of your controlling org (the one that has Valence installed). Go to Setup -> Apps -> App Manager and click “New Connected App”.
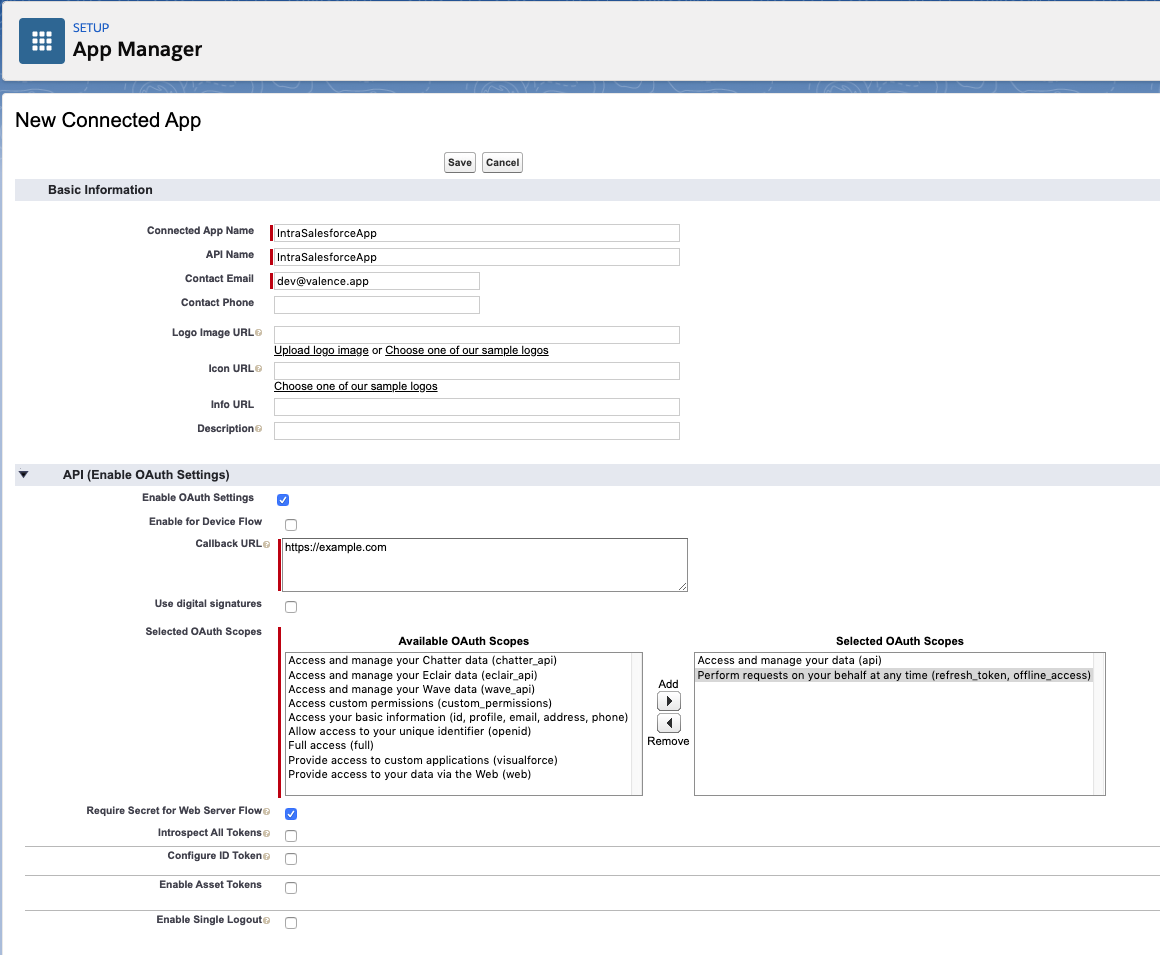
Name it however you like and set an appropriate email address
Make sure “Enable OAuth Settings” is checked
For the Callback URL, put something temporary (like https://example.com ); we’ll come back to this a few steps from now
Select the two scopes you see in the picture (api, refresh_token)
Make sure “Require Secret for Web Server Flow” is checked
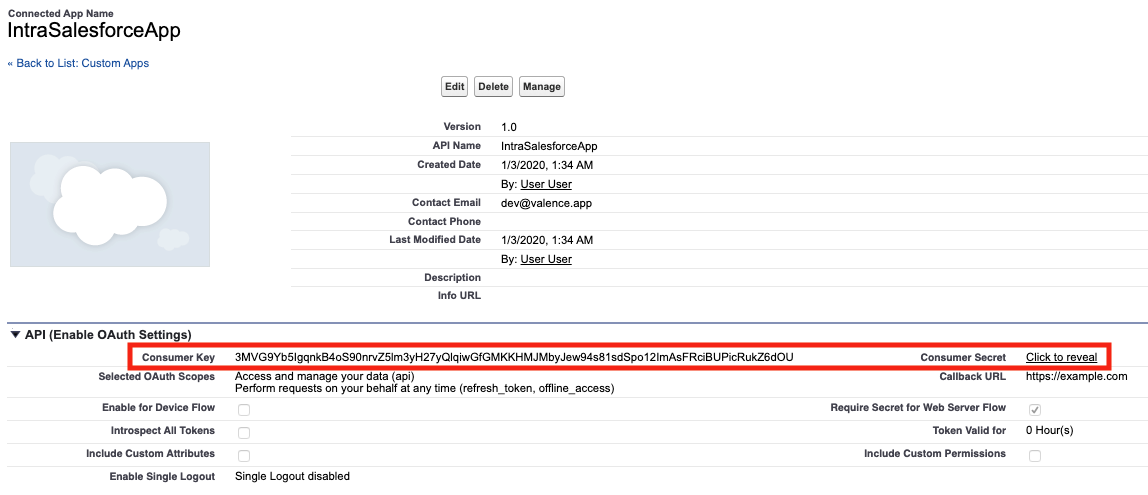
Once you save, you will need to copy the Consumer Key and Consumer Secret and use them in the next section.
Set Up The Auth Provider
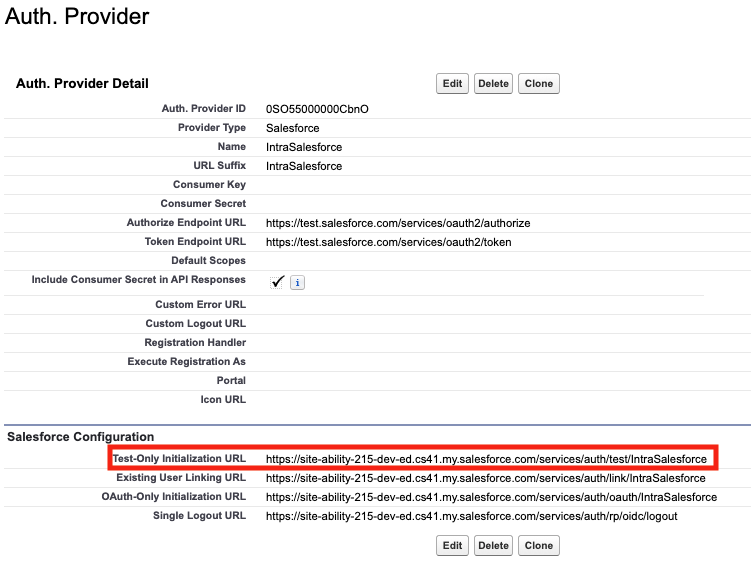
Now we will create an Auth Provider record. Go to Setup -> Identity -> Auth. Providers
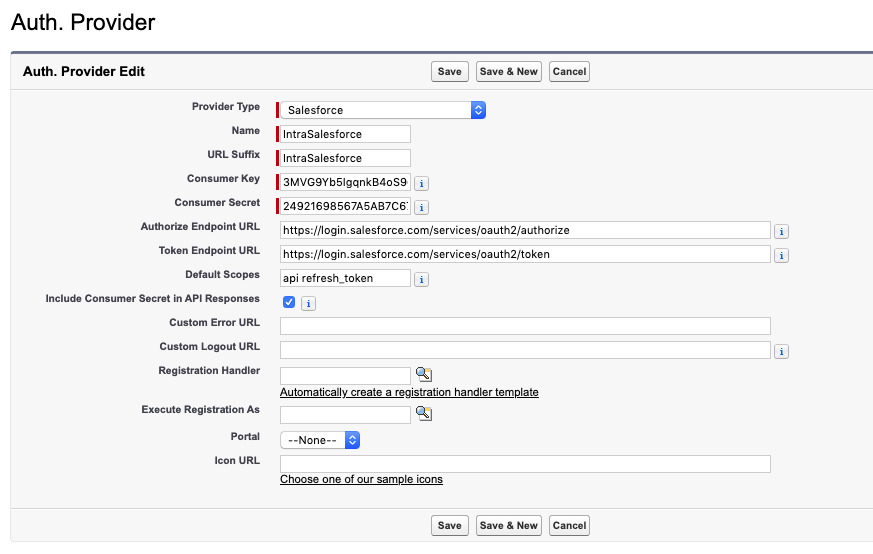
Provider Type is “Salesforce”
Name is whatever you want
Copy and paste Consumer Key and Consumer Secret from your Connected App that you created
Type out the endpoints using either test.salesforce.com or login.salesforce.com (match the remote org you want to connect to) https://login.salesforce.com/services/oauth2/authorize https://login.salesforce.com/services/oauth2/token
Set the default scopes to the same as your connected app (api refresh_token)
Make sure “Include Consumer Secret in API Responses” is checked
After saving the Auth Provider some URLs will be generated. Copy the Callback URL…we’re about to go update our Connected App.
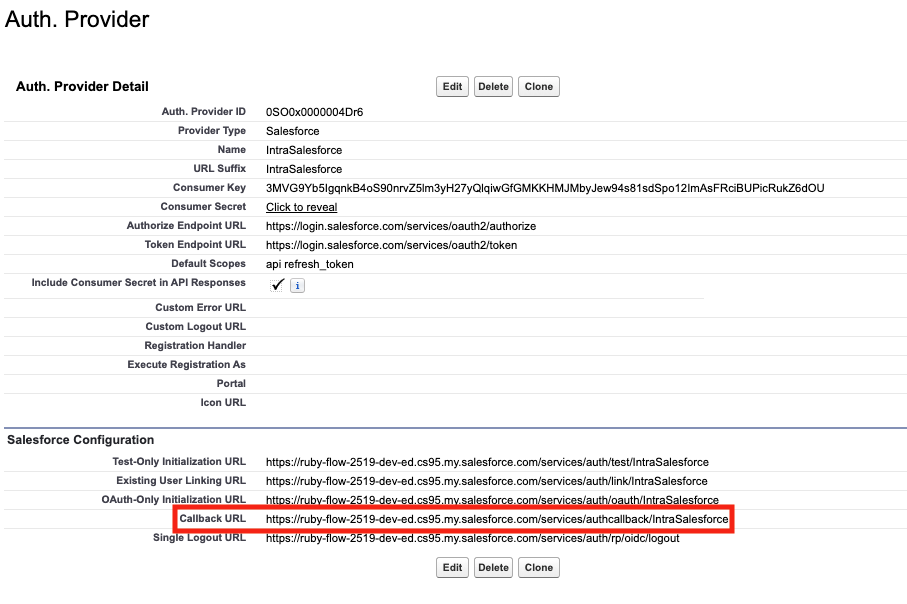
Update The Connected App Callback URL
Go back and edit the Connected App, replacing the dummy Callback URL we originally gave it with the one from the Auth Provider you just created.
It’s important that the Callback URL defined in your Connected App matches the Auth Provider Callback URL. That’s because the OAuth flow defines something called a “redirect_uri” that is used in more secure flows to mitigate certain attacks.
Tip
It is actually possible to define multiple Callback URLs on a Connected App (read the docs), so if you need to make multiple Auth Providers you could still use the same Connected App, if you wanted to.
Test Your Work So Far
Before moving on to Named Credentials, you can test that you successfully got your Connected App and Auth Provider working together by going to the Test-Only Initialization URL:
Create a Named Credential For Each Remote Salesforce Org
Named Credential is a standard Salesforce feature that is a container for authentication details. Each record holds a URL and the necessary credentials to go talk to that URL.
You will need one Named Credential record for each remote Salesforce org you will be talking to.
Here is an example Named Credential:
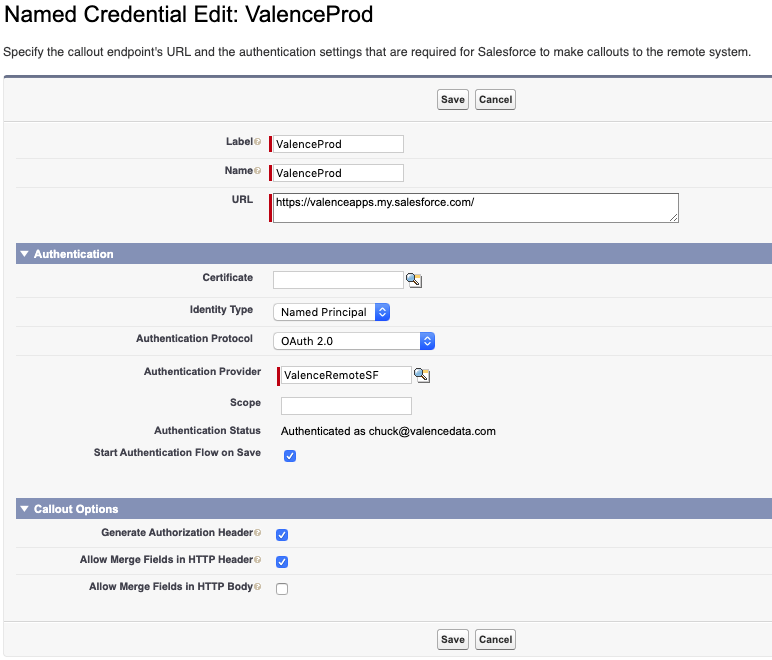
For the URL you need to use your My Domain URL for the remote Salesforce org
For Identity Type selected “Named Principal” or “Per User” (most people used “Named Principal”; to understand “Per User”, read the Named Credential documentation)
For Authentication Protocol choose “OAuth 2.0”
For Authentication Provider select an Auth Provider you set up in the previous step
Leave Scope blank (will use the default values from your Auth Provider)
Check off “Start Authentication Flow on Save”; after saving the record you will be redirected to log into the remote org to grant access for this org to interact with it
Make sure “Generate Authorization Header” is checked
Make sure “Allow Merge Fields in HTTP Header” is checked
It doesn’t matter if “Allow Merge Fields in HTTP Body” is checked or unchecked, we recommend leaving it unchecked to help prevent leaky credentials
What You End Up With When You’re Done Building Authentication
When you’re all done configuring your authentication, you will have:
Nothing defined in any of your remote orgs (all of this setup was in the controlling org)
A Named Credential record in your controlling org for each remote org you want to talk to
An Auth Provider that sits underneath the Named Credentials and tells them where to go (You can use the same Auth Provider for multiple Named Credential records)
A Connected App underneath the Auth Provider that facilitates the handshake between orgs
Finally, Some Valence Stuff
Now that you have done the hard part (setting up your authentication), the Valence side of things is pretty trivial.
You can build as many Links as you like, configured to move data between these environments.
In order to accomplish this you will be using a combination of two Adapters that come packaged in Valence: the “Local Salesforce” and “Remote Salesforce” adapters.
Let’s say you have Org A with Valence installed (aka your “controlling org”), and then two other Salesforce orgs: Org B and Org C. Here are some possible scenarios you could build:
Link |
Source Object |
Source Org |
Adapter Type |
Source Named Credential |
Target Object |
Target Org |
Adapter Type |
Target Named Credential |
|---|---|---|---|---|---|---|---|---|
Example 1 |
Account |
Org A |
Local |
No |
Account |
Org B |
Remote |
Yes (Org B) |
Example 2 |
Lead |
Org B |
Remote |
Yes (Org B) |
Contact |
Org C |
Remote |
Yes (Org C) |
You get the idea. You’ll use the Local Salesforce Adapter to get data in and out of the org where Valence is installed, and the Remote Salesforce Adapter for other orgs.
You can move data any direction between any combination of orgs.
When building a new Link, select the “Remote Salesforce” Adapter as your Source Adapter and/or Target Adapter. When you do so, you’ll be asked which Named Credential to use. Select one and you’ll be dynamically shown objects that are defined in that remote org.
That’s it. Enjoy!